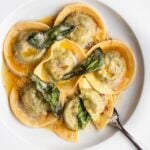
Classic Homemade Spinach Ricotta Ravioli
This filling is a classic for a reason, a super savoury mix of ricotta cheese, parmesan and spinach freshened up with a touch of lemon.
Servings: 4 people
Equipment
- Pasta roller
- Sheet trays lined with parchment paper
- Wooden cutting board
- Cookie cutters (I used a 2.5 inch one but you could use a 3.5 inch one or just use a glass and cut around it instead)
Ingredients
- 1 batch homemade pasta dough
For the filling
- 300 grams frozen spinach defrosted
- 250 grams ricotta cheese
- 80 grams parmesan cheese finely grated
- 1 tablespoon lemon juice (plus all the zest)
- salt and pepper to taste
Instructions
- Make the pasta dough using my recipe linked above in ingredient list and use the rolling guide in the recipe to roll the sheets out.
For the filling
- Once the spinach is completely defrosted put it in the middle of a clean tea towel (one that can get a bit stained!) and wrap it up, squeezing as much water out as you can.
- In a food processor (or by hand), blend all the filling ingredients together until well combined.
- Season to taste with salt and pepper. You want it on the saltier side as it will have a lot of pasta wrapped around it! A good ½ - 1 tsp salt.
- Put it into a piping bag or covered bowl in the fridge. I like to have it refrigerated for at least an hour if possible as it's easier to work with when solidified slightly.
Shaping the ravioli
- Please see all the step by step photos above and video below which will be more helpful than these written instructions!
- Roll out ¼ of your dough, I go to setting 6 on my marcato. Cut the sheet in half and place one of the sheets on a baking sheet covered with a damp tea towel so it doesn't dry out (I actually use a deep roasting tray so the tea towel doesn't touch the pasta.)
- It's a good idea to lightly dust the cutting board with flour so the ravioli don't stick when you are pressing down.
- Using the cookie cutter or glass, lightly mark out circles on the pasta sheet as a guide where to place filling.
- Pipe or spoon tablespoon size dollops of filling in the middle of the circles.
- Get the other half of the pasta sheet and lay it over top but keep one end lifted while you work around the individual mounds of filling, getting as much air out as you can. Don't worry if you get pleats, pasta is supposed to be rustic!
- Using the cookie cutter, stamp the shapes out, pressing really hard to cut through the pasta. Alternatively use a glass and run a knife around the edge.
- Lift the ravioli off the cutting board and work around the outside of the circles, pressing the two layers quite firmly to thin it out slightly.
- Place the finished shapes on a baking sheet lined with parchment paper, dusted with semolina and covered loosely with cling film.
- They will take 4 - 5 minutes to boil. Storage notes are in notes below.
- I finished them in my 10 Minute Brown Butter Sauce which is linked in notes below. Serve them with any sauce you like though!
Video
Notes
Serving - I have used my Brown Butter Sauce for Pasta, it's a classic! I serve about 5 - 7 per person.
Pasta - My Homemade Pasta Dough is perfect and it has a comprehensive step by step guide for rolling the sheets too.
Storing - I love making ravioli ahead and have a fantastic guide on How to Store Ravioli. It involves blanching, drying then freezing.
Easier shape - For an even easier ravioli shape please check out my Triangoli Recipe, it's as simple as folding a square in half and a lot less fiddly. For a traditional square ravioli head to my original Homemade Ravioli Recipe.